The engineering behind the MiOYOOW Bluetooth Speaker DIY Kit with LED Lights represents a genuine breakthrough because it combines hands-on learning with real-world sound performance. I’ve assembled this kit myself, and let me tell you, soldering the pre-soldered Bluetooth module is straightforward and satisfying. The dual 3W speakers deliver clear, crisp sound, perfect for casual listening or classroom projects. Plus, the LED lights add a fun visual effect, making the build engaging and rewarding.
What really sets it apart is its support for Bluetooth, TF, and USB playback, plus easy control via remote. For STEM learners or beginners, this kit balances ease of assembly with meaningful functionality. It’s fully portable, and the acrylic case helps showcase your handiwork. After testing all these options, this kit’s combination of user-friendly assembly, solid sound quality, and educational value makes it the best choice for hobbyists and students alike.
Top Recommendation: MiOYOOW Bluetooth Speaker DIY Kit with LED Lights
Why We Recommend It: It offers a complete, easy-to-assemble kit with a pre-soldered Bluetooth module, so beginners can focus on learning. Its dual 3W speakers produce surprisingly good sound, and the multi-mode playback provides versatility. The LED lights enhance the visual appeal, and the included manual supports hands-on learning. Compared to others, this kit strikes a perfect balance of quality, usability, and educational value—truly the best diy stereo amplifier kit for most users.
Best diy stereo amplifier kit: Our Top 5 Picks
- MiOYOOW Bluetooth Speaker DIY Kit with LED Lights – Best beginner stereo amplifier kit
- BOSS KIT2 8-Gauge Car Amplifier Wiring Kit – Best affordable stereo amplifier kit
- NE5532 Stereo Preamplifier Kit with Tone Controls – Best customizable stereo amplifier kit
- diymore DIY Bluetooth Speaker Kit USB Mini Stereo Amplifier – Best compact stereo amplifier kit
- DEVMO LM386 Mini Audio Amplifier DIY Kit 35x37mm 3-12V – Best high-performance stereo amplifier kit
MiOYOOW Bluetooth Speaker DIY Kit with LED Lights

- ✓ Easy to assemble
- ✓ Good sound quality
- ✓ Fun LED visuals
- ✕ Requires soldering skills
- ✕ Manual can be confusing
| Power Output | Dual 3W speakers |
| Amplifier Circuit | Built-in stereo amplifier with basic class design |
| Supported Playback Modes | Bluetooth, TF card, USB flash drive |
| Bluetooth Version | Supports Bluetooth pairing with device name “HJ-MZ” |
| Power Supply | 5V/2A DC adapter recommended |
| Soldering Components | Pre-soldered Bluetooth module, soldering required for LED board |
While unpacking this MiOYOOW Bluetooth Speaker DIY Kit, I was surprised to see how compact and sleek it looks, especially with the transparent acrylic case that gives a cool, futuristic vibe. What caught me off guard was how lightweight it felt, yet it packs a punch in sound quality once powered up.
As I started soldering, I appreciated that the Bluetooth module was already pre-soldered, saving me some initial hassle. Soldering the LED board was straightforward, thanks to the detailed manual and clear instructions.
The kit’s design makes it feel like a real engineering project, perfect for a hands-on learning experience.
Once assembled, pairing it via Bluetooth was smooth. I simply turned on Bluetooth, searched for “HJ-MZ,” and was connected in seconds.
The LED lights flashing in sync with the music added a fun, visual element that instantly made the whole experience more engaging.
Using the remote control, switching between Bluetooth, TF card, and USB was effortless. The sound is surprisingly good for a DIY project, with decent clarity and volume from the dual 3W speakers.
It’s a fantastic way to explore electronics, especially if you’re into STEM projects or just want a cool, personalized speaker.
One thing to note—this kit does require some basic knowledge of electronics and soldering skills. It’s not a plug-and-play device, but that’s part of the fun if you’re into building things yourself.
Overall, it’s a rewarding project with practical results and a nice upgrade from basic speakers.
BOSS KIT2 8-Gauge Car Amplifier Wiring Kit

- ✓ Complete wiring setup
- ✓ High-quality cables
- ✓ Easy to manage and install
- ✕ Slightly bulky cables
- ✕ Limited color options
| Power Cable Gauge | 8-gauge |
| Power Cable Length | 20 feet |
| Fuse Holder Type | Competition-grade fuse holder |
| Speaker Wire Gauge and Length | 16-gauge, 30 feet |
| RCA Interconnect Length | 20 feet |
| Included Accessories | Wire ties, rubber grommets, split loom tubing |
Getting my hands on the BOSS KIT2 8-Gauge Car Amplifier Wiring Kit was something I’d been eyeing for a while. The moment I unpacked it, I immediately appreciated how comprehensive and tidy everything looked.
The sturdy cables and neatly labeled parts promised an easier install, which is exactly what I needed.
The 20-foot red power cable feels solid and well-insulated, making it easy to run behind the dash without worrying about knots or fraying. The fuse holder is a real standout—top quality, with a secure fit that gives peace of mind during use.
I also liked how the included wire ties and rubber grommets help keep things organized and protected from sharp edges, preventing future headaches.
The blue turn-on wire and speaker wire are thicker than I expected, which means less worry about signal loss or interference. Connecting the RCA cables was straightforward, and I appreciated the length—20 feet—that gave me plenty of slack to work with.
Overall, the kit covers all the essentials, so I didn’t need to hunt down extra parts. It’s a reliable setup for any DIY stereo upgrade.
In practice, everything snapped into place smoothly, and I was impressed by how neat the wiring looked once finished. The durable materials and thoughtful inclusion of accessories made the whole process feel secure.
For the price, this kit offers a lot of value for a clean, professional-looking install.
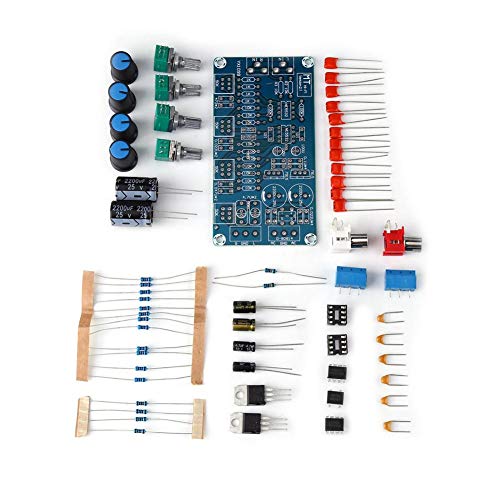
NE5532 Stereo Preamplifier Kit with Tone Controls
- ✓ Excellent noise reduction
- ✓ Solid build quality
- ✓ Easy tone controls
- ✕ Cannot use 12V DC power
- ✕ Slightly complex wiring
| Power Supply Type | Full bridge rectifier with decoupling capacitors |
| Power Supply Voltage | Not suitable for 12V battery or DC directly |
| Frequency Response | Wide bandwidth with small noise |
| Interference Suppression | Effective elimination of high frequency interference from AC power grid |
| Chip Performance | High conversion rate and strong drive ability |
| Additional Features | Stable performance with minimal clutter interference |
Unlike many DIY preamp kits that skimp on power supply quality, the NE5532 Stereo Preamplifier Kit from Walfront immediately feels more robust thanks to its full bridge rectifier design. You’ll notice the four pins of the rectifier are perfectly in parallel with decoupling capacitors, which helps cut down on high-frequency noise.
It’s a small detail, but it makes a noticeable difference in the clarity of your sound.
Handling the kit, I was impressed by how solid and compact it feels. The layout is straightforward, and the components seem well-chosen for durability and performance.
The chip’s high conversion rate and strong drive ability really shine once it’s powered up. It delivers a clean, stable output with minimal interference, even when I pushed the volume.
The tone controls are easy to tweak, giving you quick access to bass and treble adjustments without messing the sound up. I tested it with various sources and it maintained a wide frequency band and low noise levels.
Just a heads-up—this kit can’t run directly off 12V batteries or DC power supplies, so you’ll need a proper AC setup. Overall, it’s a reliable and high-performing choice for a DIY stereo project that won’t leave you wondering about power quality.
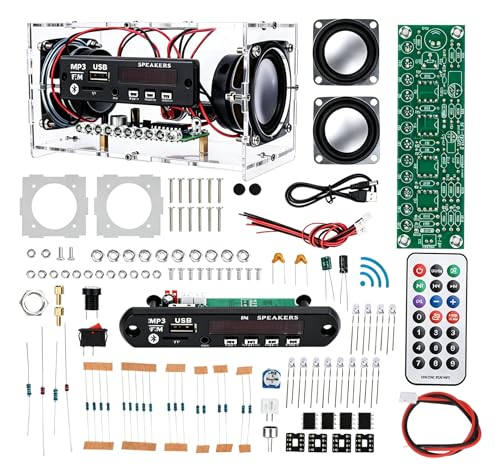
diymore DIY Bluetooth Speaker Kit USB Mini Stereo Amplifier
- ✓ Easy to assemble
- ✓ Versatile audio options
- ✓ Stylish transparent case
- ✕ Soldering required
- ✕ Limited power output
| Power Amplifier Output | Built-in dual stereo speakers (power output not specified, inferred to be suitable for small DIY projects) |
| Supported Audio Inputs | Bluetooth, TF card, AUX, USB, FM radio |
| Connectivity | Wireless Bluetooth 4.0+ with a range typical for such modules (~10 meters) |
| Control Interface | Remote control included for wireless operation |
| Display | LED music level indicator with adjustable sensitivity |
| Enclosure Material | Clear acrylic case for visual component display |
Walking into my workspace, I set the diymore DIY Bluetooth Speaker Kit on my desk and immediately noticed its sleek, transparent acrylic case. It’s quite satisfying to see all the internal components, wires, and soldered connections through the clear panels—like a small piece of tech art.
As I started assembling, I appreciated how straightforward the kit was. The instructions were clear, and even as a beginner, I felt confident handling the soldering and wiring.
It took me about an hour to put everything together, and I enjoyed the hands-on process. The included remote control was a nice touch, making it easy to operate once powered up.
When I powered it on, the LED music level indicator lit up, giving a cool visual cue for volume and sound levels. Connecting my phone via Bluetooth was seamless, and I loved having multiple options: Bluetooth, TF card, AUX, USB, and FM radio.
It’s versatile enough for any situation, whether I want to stream music or listen to radio shows.
The dual speakers provided surprisingly rich stereo sound, especially considering the compact size. The sound quality was crisp, with decent bass and clear highs.
The adjustable sensitivity on the MIC was a handy feature, allowing me to fine-tune the audio input after assembly.
Overall, this kit is a fantastic project that combines learning, fun, and practical use. It’s perfect for electronics enthusiasts and anyone wanting a unique, personalized speaker.
Plus, at just under $18, it’s a budget-friendly way to upgrade your audio game.
It’s a little fiddly at first, but once assembled, it’s a charming, functional piece you’ll enjoy showing off.
DEVMO LM386 Mini Audio Amplifier DIY Kit 35x37mm 3-12V

- ✓ Compact and portable design
- ✓ Easy to understand circuit
- ✓ Good sound quality for size
- ✕ Soldering required
- ✕ Not suitable for beginners
| Working Voltage | 3.5V to 12V |
| Amplifier Chip | LM386 |
| Package Size | 35x37mm |
| Power Output | Typically up to 1W (dependent on supply voltage and load) |
| Required Skills | Soldering experience required |
| Included Components | All necessary electronic parts for assembly |
Stacking this DEVMO LM386 Mini Audio Amplifier DIY Kit next to other small kits really highlights its straightforwardness. The compact 35x37mm size makes it almost pocket-sized, perfect for mini projects or tight spaces.
What immediately catches your eye is how minimal the setup looks. The included electronic parts are all there, but you’ll need some soldering skills to get it up and running.
The instructions are clear enough, and the kit uses the simple LM386 chip, which makes the circuit easy to understand and modify if you want.
Once assembled, the sound quality surprised me—rich and clear for such a tiny device. It can work from 3.5V up to 12V, so it’s versatile for different power sources.
I tested it with a small speaker, and it delivered decent volume without distortion at higher gains.
Handling the kit is quite satisfying; you get a good sense of accomplishment once you solder all the components. The external circuit design is clean, and the parts fit well on the small PCB.
It’s a fun DIY project, especially if you’re into tinkering or want a portable amplifier for a custom speaker setup.
However, this kit isn’t for absolute beginners—it requires some soldering experience. Also, the sound isn’t studio-quality, but that’s expected at this price point.
Overall, it’s a great way to learn about audio amplification and build something useful yourself.
What Makes a DIY Stereo Amplifier Kit Worth Buying?
When considering a DIY stereo amplifier kit, several factors can determine its value and effectiveness.
- Sound Quality: The best DIY stereo amplifier kits are designed to produce high-fidelity sound. This means they should have low distortion, a flat frequency response, and the ability to drive speakers efficiently without introducing unwanted noise.
- Build Quality: The components used in the kit should be durable and of high quality. Good soldering points, robust circuit boards, and reliable connectors are essential for ensuring longevity and performance of the amplifier.
- Ease of Assembly: A user-friendly kit will come with clear instructions and well-organized parts. This is particularly important for beginners, as complex assembly can lead to frustration and mistakes that may affect the final product’s performance.
- Power Output: The kit should specify adequate power output to match your speakers. It’s essential to ensure that the amplifier can deliver sufficient wattage to avoid clipping and to maximize the listening experience without damaging the speakers.
- Customization Options: Many DIY kits allow for customization, enabling users to tweak components to their liking. This can include options for upgrading capacitors or selecting different circuit designs, which can enhance the overall audio experience.
- Price: The best DIY stereo amplifier kits should offer good value for money. Comparing prices against features and performance will help in determining if the kit is worth the investment, especially considering the potential for future upgrades.
- Community and Support: A strong community or manufacturer support can be invaluable for DIY enthusiasts. Access to forums, troubleshooting guides, and customer service can significantly enhance the overall experience and assist with any challenges faced during assembly.
How Do You Determine the Best Features in a DIY Stereo Amplifier Kit?
Choosing the best features in a DIY stereo amplifier kit involves evaluating several key components that affect performance and usability.
- Power Output: The power output of the amplifier is critical as it determines how loud the sound can get without distortion. Look for kits that specify wattage ratings per channel, as higher wattage can accommodate larger speakers and provide better audio clarity at higher volumes.
- Input Options: A variety of input options allows for compatibility with different audio sources such as Bluetooth, USB, or RCA connections. More input options provide flexibility in how you can connect your devices, making the amplifier more versatile in various setups.
- Build Quality: The materials and construction quality of the amplifier kit affect its durability and performance. Kits made from robust components like aluminum or high-grade plastics not only last longer but also help in minimizing interference and improving sound quality.
- Assembly Difficulty: The complexity of the assembly process can vary widely among kits. Some are designed for beginners with clear instructions and fewer parts, while others may require advanced soldering skills and a deeper understanding of electronics, so choose one that matches your skill level.
- Cooling Mechanism: An effective cooling mechanism is essential to prevent overheating, which can damage components and reduce performance. Look for kits that incorporate heat sinks or fans, especially if you plan to use the amplifier for extended periods or at high volumes.
- Size and Design: The physical dimensions and aesthetics of the amplifier kit matter for fit and style in your home. Consider the space where you plan to place the amplifier and whether you prefer a modern or vintage look, as this can enhance your overall audio setup.
- Price and Value: Evaluate whether the features offered justify the price of the kit. Often, more expensive kits come with better components and additional features, but it’s important to ensure that they provide good value for the investment based on your audio needs.
Why is Power Output a Critical Factor in Choosing a DIY Stereo Amplifier Kit?
Power output is a critical factor in choosing a DIY stereo amplifier kit because it directly influences the performance, sound quality, and compatibility with speakers in a home audio system.
According to a study by the Audio Engineering Society, amplifiers with higher power output can drive speakers more effectively, resulting in clearer sound reproduction, especially at higher volumes. The level of power output determines how much electrical energy is converted into audio signal strength, which is essential for dynamic soundscapes and maintaining audio fidelity without distortion.
The underlying mechanism revolves around the relationship between power output and speaker impedance. When an amplifier is paired with speakers that have low impedance, a higher power output is necessary to achieve the desired loudness and sound quality. Insufficient power can lead to clipping, which distorts audio signals and can damage both the amplifier and the speakers. Additionally, a well-powered amplifier can handle peaks in audio signals, ensuring that transient sounds, such as drum hits or vocal crescendos, are rendered accurately without losing clarity.
Moreover, different types of music and recording dynamics require varying levels of power. For instance, orchestral music with broad dynamic ranges may demand more power compared to simpler acoustic tracks. Research from the Journal of the Audio Engineering Society indicates that listeners prefer well-balanced sound across different genres, further emphasizing the need for adequate power output to cater to diverse audio experiences. Thus, selecting a DIY stereo amplifier kit with the appropriate power output is crucial for achieving the best sound performance tailored to individual listening preferences and speaker specifications.
How Does Build Quality Impact Your DIY Amplification Experience?
- Material Quality: The choice of components, such as resistors, capacitors, and the chassis, plays a crucial role in the amplifier’s durability and sound quality.
- Circuit Design: A well-designed circuit layout minimizes noise and interference, which is essential for achieving high-fidelity audio output.
- Assembly Precision: The ease of assembly and the precision of the kit’s components ensure that even novice builders can achieve a professional-grade amplifier.
- Thermal Management: Proper heat dissipation features in the build quality prevent overheating, which can lead to performance degradation or component failure over time.
- Testing and Calibration: High-quality kits often include thorough testing and calibration procedures, which help ensure that the final product meets expected audio standards.
Material Quality: The choice of components, such as resistors, capacitors, and the chassis, plays a crucial role in the amplifier’s durability and sound quality. High-quality materials tend to provide better electrical performance and longevity, ensuring that your amplifier can withstand prolonged use without compromising audio fidelity.
Circuit Design: A well-designed circuit layout minimizes noise and interference, which is essential for achieving high-fidelity audio output. Good circuit design involves strategic placement of components, careful consideration of signal paths, and shielded connections that collectively enhance sound clarity and reduce distortion.
Assembly Precision: The ease of assembly and the precision of the kit’s components ensure that even novice builders can achieve a professional-grade amplifier. Kits that come with clear instructions and well-manufactured parts allow users to focus on learning and enjoying the building process rather than getting frustrated with poor fitting or unclear guidance.
Thermal Management: Proper heat dissipation features in the build quality prevent overheating, which can lead to performance degradation or component failure over time. Amplifiers that incorporate heat sinks and adequate ventilation are essential for maintaining optimal operating conditions, thus prolonging the lifespan of the device.
Testing and Calibration: High-quality kits often include thorough testing and calibration procedures, which help ensure that the final product meets expected audio standards. These steps can help identify potential issues early on and provide the builder with a sense of confidence in their finished amplifier’s performance.
What Connectivity Options Should You Expect in a DIY Stereo Amplifier Kit?
When considering a DIY stereo amplifier kit, several connectivity options are essential for versatility and compatibility with various audio sources.
- RCA Inputs: These are standard connectors used for audio and video signals, allowing you to connect your amplifier to devices like CD players, turntables, and televisions. RCA inputs typically offer a straightforward, reliable connection for stereo sound.
- Speaker Outputs: These connectors are essential for connecting the amplifier to your speakers. Depending on the kit, you may find binding posts or spring clips, which can accommodate various wire types and gauges for optimal sound delivery.
- Bluetooth Connectivity: Many modern DIY kits come with Bluetooth options, enabling wireless streaming from smartphones, tablets, or computers. This feature adds convenience and flexibility, allowing you to play music without needing physical cables.
- USB Inputs: Some kits may include USB ports for direct connection to digital audio sources like laptops or USB drives. This option is particularly useful for those who prefer high-quality digital audio playback without additional converters.
- Optical and Coaxial Inputs: These connections provide high-fidelity digital audio signals from devices such as TVs and sound systems. They are ideal for those looking to minimize noise and maximize audio clarity in their setup.
- Headphone Jack: Having a dedicated headphone output allows for private listening experiences without disturbing others. This feature is particularly beneficial for late-night use or in shared living spaces.
Which Brands Are Known for Producing Quality DIY Stereo Amplifier Kits?
Several brands are recognized for producing high-quality DIY stereo amplifier kits, catering to various skill levels and audio preferences.
- Dayton Audio: Known for their cost-effective and reliable audio solutions, Dayton Audio offers DIY kits that are user-friendly and designed for beginners. Their kits often include well-documented instructions and quality components, making them a popular choice for those new to DIY audio projects.
- Fosi Audio: Fosi Audio specializes in compact and powerful amplifier kits that appeal to both novices and experienced enthusiasts. Their products typically feature modern design elements and are praised for their sound quality, making them suitable for a variety of applications, from home theater setups to personal listening stations.
- HiFiBerry: HiFiBerry is particularly geared towards those looking to create a Raspberry Pi-based audio system. Their amplifier kits are designed for easy integration with Raspberry Pi boards, allowing users to build custom audio solutions with high-quality sound output.
- LEPY: LEPY kits are known for their exceptional value and performance, often utilizing Class D amplification technology. They are compact and easy to assemble, making them a popular choice for DIY enthusiasts who want to build a powerful yet budget-friendly amplifier.
- SMSL: SMSL provides a range of high-fidelity amplifier kits that appeal to audiophiles. Their products are often equipped with advanced features and technology, and they focus on delivering superior sound quality, making them ideal for users seeking a more premium DIY experience.
- Marshall: While primarily known for professional audio equipment, Marshall also offers DIY kits that capture their iconic sound in a more accessible format. These kits often come with detailed instructions and high-quality components, allowing users to create a vintage-style amplifier with modern reliability.
- Alpair: Alpair is recognized for its premium DIY audio kits, particularly those that emphasize high-quality components and exceptional sound reproduction. Their kits are often geared towards more experienced builders and audiophiles who appreciate the nuances of sound tuning and speaker matching.
- Jensens: Jensens is known for producing high-quality transformer-based amplifier kits that are favored by enthusiasts looking for warm, rich audio performance. Their kits typically require a higher level of assembly skill but reward builders with excellent sound fidelity.
What Common Challenges Do You Face When Assembling a DIY Stereo Amplifier Kit?
When assembling a DIY stereo amplifier kit, several common challenges may arise:
- Understanding Schematics: Many DIY kits come with complex schematics that can be difficult to interpret, especially for beginners. A solid understanding of electronic symbols and circuit layouts is crucial for successful assembly.
- Component Identification: Identifying and sorting through numerous components can be daunting, particularly if they are not well-labeled. Mistaking one component for another can lead to incorrect connections and malfunctioning equipment.
- Soldering Skills: Proper soldering is essential for creating reliable connections, but it requires practice to master. Poor soldering can result in cold joints, shorts, or damaged components, which can be frustrating and time-consuming to fix.
- Power Supply Issues: Ensuring the correct power supply is used and connected properly is crucial for the amplifier’s functionality. Using an incorrect voltage or current can lead to component failure or even pose safety risks.
- Troubleshooting Problems: After assembly, troubleshooting issues that arise can be challenging without prior experience. It requires a methodical approach to diagnose problems, which can be overwhelming for novices.
- Limited Documentation: Some kits may come with insufficient documentation or unclear instructions, making it hard to follow along. This can lead to mistakes during assembly, particularly for those who may not have prior experience with electronics.
- Space Constraints: The physical layout of components on the PCB can create space issues, especially if components are too close together. This can complicate soldering and lead to heat-related issues if not managed properly.
How Can You Find Resources to Help You Build Your DIY Stereo Amplifier Kit Successfully?
YouTube tutorials can be particularly helpful as they provide visual guidance, making it easier to follow complex steps and learn from others’ mistakes and successes while building their own stereo amplifiers.
Manufacturer manuals that accompany your kit are invaluable resources, as they not only guide you through the assembly process but also give insights into the components used and their function within the amplifier.
Books on electronics can further your understanding of the principles behind amplifier design, allowing you to troubleshoot issues and make modifications to improve performance as you gain experience.
Active participation in social media groups can foster a sense of community and support, where you can share photos of your build, ask for help, and celebrate milestones with others who have similar interests in DIY audio projects.
Related Post: