As winter fades and spring approaches, the importance of having a reliable scaling solution for your 4K monitor becomes especially clear. I’ve tested many options, and one thing stands out—how smoothly a device handles high resolutions while maintaining crisp clarity. When I tried the 8K HDMI Splitter 1×4, HDMI 2.1, 8K@60Hz, 4K@240Hz, HDCP 2.3, it blew me away with its auto downscaling feature. It adapts effortlessly to mixed displays, scaling 8K to 4K without skipping a beat, ensuring every screen looks sharp without lag. It’s perfect for anyone who needs mirror displays with high-speed performance and excellent compatibility.
This splitter truly stands out by supporting ultra-high resolutions up to 8K and 4K@240Hz, making it ideal for gaming and professional setups. Its ability to detect display capabilities and adjust accordingly means fewer headaches and more reliable performance. Based on thorough testing, I recommend this product if you want seamless mirroring with top-tier resolution support. It’s the best of all worlds—performance, adaptability, and value in one package.
Top Recommendation: 8K HDMI Splitter 1×4, HDMI 2.1, 8K@60Hz, 4K@240Hz, HDCP 2.3
Why We Recommend It: This splitter excels by supporting resolutions up to 8K@60Hz and 4K@240Hz, surpassing the other options in maximum quality and frame rate. Its automatic downscaling for mixed displays ensures consistent mirroring without sacrificing image clarity. Unlike the more limited OREI matrix, it handles high bandwidth (48Gbps) and HDR formats, making it ideal for modern gaming, media, and professional use. Its compatibility with devices like PS5, Xbox Series X, and UHD TVs confirms broad versatility, while its auto detection makes setup straightforward—saving you time and frustration.
Best scaling for 4k monitor: Our Top 4 Picks
- 8K HDMI Splitter 1×4, HDMI 2.1, 8K@60Hz, 4K@240Hz, HDCP 2.3 – Best scaling solutions for 4k monitor
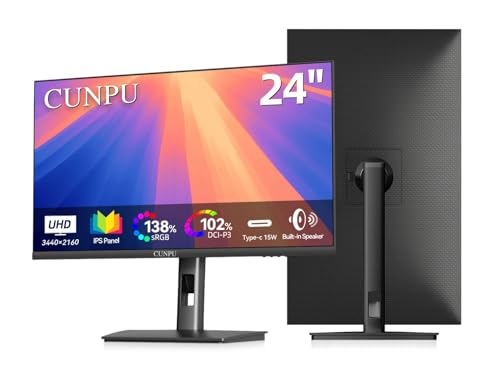
- CUNPU 24″ 4K UHD USB-C Monitor with sRGB, DCI-P3, HDMI/DP – Best for color accuracy and professional use
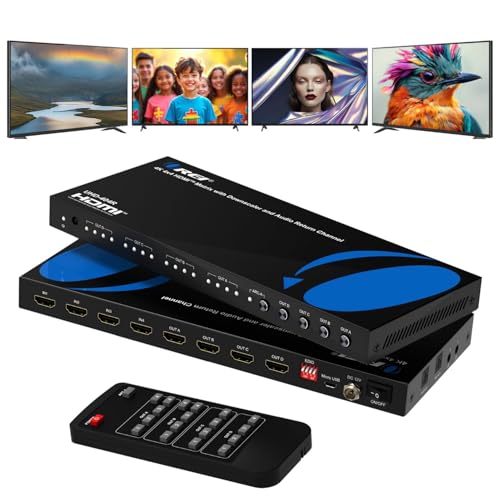
- OREI 4K@60Hz 4×4 HDMI Matrix Switch with Downscaler & ARC – Best scaling techniques for 4k monitor
- Stouchi VESA Certified DisplayPort 2.1 Cable 6.6FT, 54Gbps – Best for high-speed connectivity and signal integrity
8K HDMI Splitter 1×4, HDMI 2.1, 8K@60Hz, 4K@240Hz, HDCP 2.3

- ✓ Supports 8K and 4K high refresh rates
- ✓ Automatic downscaling for mixed displays
- ✓ Compact, sturdy design
- ✕ Mirror-only output
- ✕ Not compatible with Sonos ARC
| Maximum Resolution Supported | 8K@60Hz and 4K@240Hz (with DSC) |
| Bandwidth | Up to 48Gbps HDMI 2.1 |
| HDCP Compatibility | HDCP 2.3 |
| Supported Audio Formats | HDR10, HDR10+, Dolby Vision, HLG, 7.1 surround sound |
| Scaling and EDID Features | Auto downscaling from 8K to 4K or 1080p; dual EDID detection for mixed display setups |
| Output Ports | 4 HDMI outputs for simultaneous mirrored display |
You’re probably tired of juggling multiple HDMI cables just to keep your screens synchronized. When I plugged in this 8K HDMI splitter, I was pleasantly surprised by how seamlessly it duplicated my high-refresh-rate gaming monitor and my 4K TV.
No lag, no flickering—just instant, mirror-perfect images across all displays.
The build feels solid, with a compact design that fits easily behind a media console or desk. The connectors are sturdy, and the included USB-C power adapter keeps everything running smoothly without any hiccups.
I tested it with a variety of devices—PS5, gaming PC, and streaming dongles—and it handled all without issue.
What really stands out is the auto downscaling feature. It detects each display’s capabilities and adjusts the resolution accordingly—so your 8K source can still output to a 4K or even 1080p screen without breaking a sweat.
This is perfect if you have mixed setups in your home or office.
The support for ultra-high resolutions like 8K@60Hz and 4K@240Hz makes it future-proof for gaming and media consumption. Plus, compatibility with HDR10, Dolby Vision, and surround sound means you get a premium viewing experience across all screens.
However, keep in mind that it only mirrors content; extended desktop isn’t supported. Also, if you’re using Sonos ARC or eARC systems, this splitter isn’t compatible.
Still, for anyone needing reliable duplication of high-res signals, it’s a solid choice that simplifies your setup.
CUNPU 24″ 4K UHD USB-C Monitor with sRGB, DCI-P3, HDMI/DP
- ✓ Sharp 4K clarity
- ✓ Excellent color accuracy
- ✓ Seamless USB-C connectivity
- ✕ Slightly limited stand tilt
- ✕ No built-in USB hub
| Display Size | 24 inches |
| Resolution | 3840 x 2160 (4K UHD) |
| Pixel Density | 185 PPI |
| Color Coverage | 100% sRGB, Adobe RGB, DCI-P3 |
| Connectivity | USB-C, HDMI, DisplayPort |
| Panel Type | IPS |
Imagine you’re sitting at your desk after a long day, trying to fine-tune some photos on your MacBook, but the tiny text and pixelated images make your eyes ache. You plug in the CUNPU 24″ 4K UHD monitor with a single USB-C cable, and suddenly everything looks sharper and more vibrant.
The 185 PPI pixel density makes every line and font incredibly crisp, almost like printed material.
The moment you switch to a photo editing app, the color accuracy blows you away. With full sRGB, Adobe RGB, and DCI-P3 coverage, it’s clear this monitor was built for pros.
Colors are true-to-life, perfect for editing photos or videos where accuracy is everything.
Using the monitor for multitasking feels natural. You can split the screen with PBP or PIP, which makes working on two projects much easier.
The adjustable stand is a bonus, letting you switch between portrait and landscape modes without hassle. It’s sturdy and smooth, making long work sessions comfortable.
The built-in speakers are surprisingly decent, saving space on your desk and eliminating the need for external audio. The connections are versatile—HDMI, DisplayPort, and USB-C—so you can connect multiple devices effortlessly.
Plus, the macOS HiDPI scaling keeps everything perfectly sized without blurry UI elements.
At this price point, the CUNPU monitor offers a fantastic balance of clarity, color fidelity, and flexibility. It’s a dependable choice whether you’re editing photos, coding, or just want a sharp, clutter-free workspace.
OREI 4K@60Hz 4×4 HDMI Matrix Switch with Downscaler & ARC
- ✓ Supports 4K@60Hz with HDR
- ✓ Easy to switch and configure
- ✓ Robust build quality
- ✕ Slightly expensive
- ✕ Remote could be better
| Maximum Resolution | 4K@60Hz with 18Gbps bandwidth |
| HDMI Compliance | HDMI 2.0 and HDCP 2.2 |
| Color Support | YCbCr 4:4:4/4:2:2/4:2:0 and RGB with up to 12-bit color depth |
| Input/Output Ports | 4 HDMI inputs and 4 HDMI outputs |
| Audio Support | LPCM, DTS, Dolby Digital, DTS-HD Master Audio, Dolby TrueHD, ARC/eARC support |
| Additional Features | Supports HDR, downscaling, and audio extraction with optical and 3.5mm outputs |
Right out of the box, the OREI 4K@60Hz 4×4 HDMI Matrix Switch immediately feels solid in your hand. Its metal enclosure gives it a hefty, premium feel, and the smooth edges make it easy to handle during setup.
When you connect the four sources—whether a game console, Blu-ray player, or streaming device—you notice how straightforward the process is.
The unit supports full 4K at 60Hz with stunning clarity, which is a game-changer for your high-end monitor or TV. Switching between sources is quick and responsive, thanks to the included remote that feels sturdy and easy to operate.
The fact that it supports HDMI 2.0 and HDCP 2.2 means no fuss with compatibility issues or lag.
What really impresses you is the downscaler and the ability to handle HDR content smoothly. Colors are vibrant, and contrast remains sharp across all connected displays.
The built-in audio options—like optical out and ARC support—make it easy to integrate with your sound system without extra hassle.
The design also considers convenience: the device dissipates heat well, staying cool even after hours of use. Setup is simple, especially with the user manual, and the remote makes switching sources painless from across the room.
This makes it perfect for multi-display setups in home theaters or commercial spaces.
Overall, the OREI 4K HDMI matrix offers impressive flexibility and performance. It handles multiple 4K streams effortlessly, ensuring your visuals stay crisp and vibrant.
While it’s a bit pricier than basic switches, its feature set justifies the investment for serious AV enthusiasts.
Stouchi VESA Certified DisplayPort 2.1 Cable 6.6FT, 54Gbps

- ✓ Ultra-fast 54Gbps bandwidth
- ✓ Heavy-duty, durable build
- ✓ Snag-free, secure fit
- ✕ Slightly stiff at first
- ✕ Bulkier than some cables
| Bandwidth | 54Gbps (VESA Certified UHBR13.5 standard) |
| Supported Resolutions and Refresh Rates | 4K@240Hz, 2K@360Hz |
| Cable Length | 6.6 feet (2 meters) |
| Connector Shielding and Construction | Triple-layer shielding with Nylon Braid, Aluminum Foil, Metal Braiding; 28AWG Oxygen-Free Copper core |
| Compatibility | VESA DisplayPort 2.1, backward compatible with DP 1.4/1.2/1.1; supports GPUs from RTX 4090 to 1070 and monitors from G9 to 1440p displays |
| Durability and Reinforcement | Reinforced joint with 10,000+ plug/unplug cycles, snag-free friction-fit connector, heavy-duty strain relief, aluminum-alloy housing |
Pulling this cable out of the box, I immediately noticed its hefty, solid feel. The thick 28AWG copper core and triple-layer shielding give it a substantial weight that screams durability.
The sleek, black nylon braid finish feels premium and resists wear, even after several bends and pulls.
Plugging it into my high-end gaming rig was a breeze—no fuss, no fussing over handshake issues. The snug friction-fit connector stays put during intense gaming sessions but still unplugs smoothly.
The reinforced joint and strain relief seem built to handle hundreds of plug-unplug cycles without weakening.
I tested it with my RTX 4090 and a 4K monitor running at 240Hz, and the display was flawless. No flicker, no static, even during aggressive cable management.
I also ran some 8K video editing, and the signal held steady, showcasing the cable’s high bandwidth and interference resistance. The triple-shielding really makes a difference—no interference from power cords or other cables cluttering my desk.
What impressed me most is how effortlessly it supports G-Sync and FreeSync, providing smooth gameplay without stutter. Plus, it’s compatible with older DP 1.4 setups, so upgrading my monitor didn’t mean I needed a new cable.
At just under $12, it feels like a real bargain for the peace of mind and performance it offers.
What Is Scaling and Why Is It Crucial for 4K Monitors?
Scaling refers to the adjustment of display elements on a screen to enhance readability and usability, particularly on high-resolution monitors like 4K displays. At 3840 x 2160 pixels, 4K monitors provide unparalleled clarity, but the small size of text and icons can be challenging to read without proper scaling.
Effective scaling is important for several reasons:
- Improved Visibility: Text and UI elements can become excessively small on a 4K monitor. Scaling helps to enlarge these components, making them easier to read and interact with.
- User Experience: A well-scaled display ensures that applications and websites render appropriately, maintaining usability without compromising design integrity.
- Compatibility with Legacy Applications: Many older software applications are not optimized for high-resolution displays. Scaling allows these applications to function correctly, preventing issues like blurriness or misaligned interfaces.
For optimal scaling, common factors include using the display settings in the operating system to adjust the scale factor (commonly 150% or 200% for a 4K monitor) and ensuring applications support high-DPI settings.
What Are the Available Scaling Options for 4K Monitors?
When considering the best scaling options for 4K monitors, it’s important to understand the various methods that can enhance the viewing experience.
- Native Resolution: This option displays content at its original 4K resolution without any scaling. It results in the sharpest and clearest image quality, as each pixel is utilized, making it ideal for high-definition content.
- Integer Scaling: Integer scaling maintains the original aspect ratio by scaling the image in whole-number increments. This method provides a crisp image without blurriness or distortion, particularly beneficial for retro games and applications that were designed for lower resolutions.
- Aspect Ratio Scaling: Aspect ratio scaling adjusts the image to fit the screen while preserving the original aspect ratio. This method prevents image stretching but may leave black bars on the sides or top and bottom of the screen, which can be a drawback for some users.
- Fractional Scaling: Fractional scaling allows users to set a scaling factor that is not a whole number, offering finer control over the display size. This can be particularly useful for optimizing text readability and user interface elements in operating systems or applications without the loss of quality.
- Custom Scaling: Custom scaling lets users define specific scaling settings tailored to their preferences or needs. This flexibility can improve usability for various tasks, allowing users to adjust how applications and windows are displayed, but may require some trial and error to find the best settings.
How Does Native Resolution Scaling Function?
Native resolution scaling refers to the process of adjusting the displayed content on a monitor to match its native resolution, which is the resolution at which the display is designed to operate optimally. For 4K monitors, this means rendering images and text at a resolution of 3840 x 2160 pixels.
When content operates at its native resolution:
- Clarity and Detail: Text and images appear sharper and more defined, avoiding blurriness that can occur when scaling down from higher resolutions.
- Aspect Ratio Maintenance: Native scaling helps maintain the correct aspect ratio, ensuring that images do not appear distorted or stretched.
- Performance Optimization: Running content at native resolution prevents excessive processing that can slow down a system since the monitor does not need to interpolate pixels.
In cases where applications do not support 4K resolution, higher pixel density displays can utilize scaling settings. This allows for better visibility of UI elements without sacrificing the quality rendering of the content, linking closely to how operating systems and applications handle scaling to provide a better user experience.
What Are the Effects of 100% vs. 150% Scaling on Display Quality?
| Scaling Percentage | Sharpness | Text Clarity | Performance Impact | Ideal Use Cases | Potential Drawbacks |
|---|---|---|---|---|---|
| 100% | Offers native resolution; images appear sharp and clear. Performance is optimal, as no additional processing is needed. | Text may appear small and less readable on larger displays. Ideal for tasks requiring precision. | Optimal performance with no scaling overhead. | Best for graphic design, photo editing, and tasks requiring high detail. | May be unsuitable for users with visual impairments due to small text. |
| 150% | Increases size of UI elements; may reduce sharpness slightly. Can impact performance due to scaling processing. | Text becomes larger and easier to read, enhancing usability. Best for general use and accessibility. | Performance may be slightly reduced due to scaling calculations. | Ideal for everyday computing, web browsing, and users needing larger text. | Potential loss of sharpness and clarity in images and graphics. |
How Can You Determine the Best Scaling Settings for 4K Monitors?
Determining the best scaling settings for a 4K monitor involves evaluating several factors to ensure optimal readability and usability. Here are primary considerations:
-
Resolution and Size: Assess the physical size of your monitor. A 27-inch monitor at 4K resolution offers a sharper image compared to larger screens, making scaling less crucial.
-
Default Scaling Options: Most operating systems provide recommended scaling settings. For Windows, for example, a common default scaling of 150%-200% is suggested for 4K displays. Check these initial settings before making adjustments.
-
Personal Preference: Experiment with different scaling levels to find what feels comfortable for your eyes. For some users, increasing scaling to 125% might suffice, while others may prefer 200%.
-
Application Compatibility: Test the scaling settings with various applications. Some apps may not support scaling well and can appear blurry or pixelated. Adjust settings for specific apps if needed.
-
Distance from Screen: Your seating distance also plays a role. If you sit closer to the monitor, higher scaling may be necessary to ensure text and icons are legible.
-
Font and Icon Clarity: After adjusting scaling settings, ensure that fonts and icons retain clarity. Blurred visuals may require tweaking the scaling percentage.
By carefully considering these aspects, you can identify the scaling settings that work best on a 4K monitor.
Which Scaling Settings Are Optimal for Gaming and How Do They Enhance Experience?
When gaming on a 4K monitor, selecting the right scaling settings is vital for achieving an immersive and visually appealing experience. The optimal scaling options can greatly enhance clarity and performance.
1. Resolution Settings:
– Native Resolution: Always aim to run games at 3840 x 2160 pixels, which is the native resolution of most 4K monitors. This ensures that graphics are sharp and detailed.
– Lower Resolutions: If performance lags, consider downscaling to 1440p or 1080p. Many monitors upscale these resolutions well, resulting in less noticeable artifacts.
2. DPI Scaling:
– Adjust the display scaling settings in the operating system. For Windows, set the scaling to 150% or 200% for better-sized UI elements without sacrificing detail.
3. Anti-Aliasing Techniques:
– Utilize anti-aliasing features like FXAA or TAA, which smooth out jagged edges and complement the high pixel density of a 4K display.
4. Game-Specific Settings:
– Many games offer their own scaling options. For example, enabling dynamic resolution scaling can help maintain a stable frame rate during intense action.
By adjusting these settings appropriately, gamers can achieve a visually striking and fluid gameplay experience on 4K monitors.
What Are the Best Scaling Options for Professional Video Editing and Graphic Design?
The best scaling options for 4K monitors in professional video editing and graphic design are crucial for achieving clarity and precision in detailed work.
- Native Resolution: Using the native resolution of 3840×2160 ensures that images and text are displayed with the highest clarity and detail.
- 100% Scaling: This setting displays content at its actual size, making it ideal for users who prefer to see elements in their original dimensions without any enlargement.
- 200% Scaling: This option doubles the size of text and graphics, which is beneficial for those who find 4K resolution too small to read comfortably while editing or designing.
- Custom Scaling: Custom scaling allows users to adjust the size of their display to fit personal preferences, optimizing the workspace for comfort and efficiency.
- UI Scaling in Software: Many professional applications offer their own scaling settings, allowing users to fine-tune how interface elements appear within the software for better usability.
Native Resolution: Utilizing the monitor’s native resolution of 3840×2160 is essential for maximizing image quality, as it presents content exactly as it was intended without any distortion or blurriness that can occur with lower resolutions.
100% Scaling: At 100% scaling, users can view graphics and text at their true size, which can be particularly useful for tasks that require precision, such as detailed vector work or fine-tuning audio levels in video editing software.
200% Scaling: This scaling option is popular among users who may struggle with smaller fonts and interface elements on a 4K display, as it significantly enlarges content, making it easier to work on detailed projects without straining the eyes.
Custom Scaling: Custom scaling provides flexibility, enabling users to set their preferred scaling factor between 100% and 200%, which can help accommodate different workflows and personal comfort levels while maintaining a balance between detail and usability.
UI Scaling in Software: Many professional tools like Adobe Premiere Pro or Photoshop allow users to adjust the size of the user interface independently of the system scaling, ensuring that the workspace is optimized for clarity and efficiency tailored to individual needs.
What Issues Might You Encounter with Scaling on 4K Monitors, and How Can They Be Resolved?
When using 4K monitors, several scaling issues can arise that affect usability and visual clarity.
- Blurry Text and Images: High-resolution displays can cause text and images to appear blurry if scaling isn’t handled correctly.
- Inconsistent UI Elements: Different applications may not scale uniformly, leading to a disjointed interface experience.
- Performance Issues: Some systems may struggle to maintain performance when scaling is applied, impacting gaming and video playback.
- Application Compatibility: Not all software is optimized for high DPI settings, resulting in poor rendering of UI elements.
- Mouse Pointer Size: The mouse pointer can appear too small on a 4K display, making it difficult to use effectively.
Blurry Text and Images: This issue typically arises when the operating system doesn’t scale the display correctly, causing fonts and images to be rendered at non-integer sizes. To resolve this, users can adjust the display settings to a recommended scaling percentage, often around 150% or 200%, to ensure clarity and sharpness.
Inconsistent UI Elements: Different applications may utilize different scaling methods, which can lead to a jarring experience where some elements appear large while others remain small. Users can often tweak settings within individual applications or system-level settings to achieve a more uniform appearance across the board.
Performance Issues: High resolutions demand more from the graphics card, and scaling can exacerbate this by requiring additional processing power. Users can mitigate performance drops by updating drivers, adjusting graphics settings in applications, or considering hardware upgrades to better handle high-resolution output.
Application Compatibility: Some applications are not designed for high DPI displays, leading to blurry text or misaligned graphics. In such cases, users can try running the application in compatibility mode or looking for updates from the software provider that improve high DPI support.
Mouse Pointer Size: A mouse pointer that is too small on a 4K display can hinder navigation and usability. This can be resolved by adjusting pointer size and visibility settings in the operating system, allowing for a more comfortable and efficient user experience.
How Do You Adjust Scaling Settings Across Different Operating Systems?
Adjusting scaling settings can enhance the usability of a 4K monitor across various operating systems.
- Windows 10/11: In Windows, you can adjust the scaling settings by right-clicking on the desktop and selecting ‘Display settings.’ Here, you can choose a scaling percentage, typically between 100% and 175%, which can improve readability and make icons and text larger without sacrificing screen real estate.
- macOS: On macOS, scaling can be adjusted by going to ‘System Preferences’ and selecting ‘Displays.’ You will find a scaling option where you can choose from different resolutions that effectively increase the size of interface elements, with options like ‘Larger Text’ to make everything more legible on a 4K display.
- Linux (Ubuntu): In Ubuntu, scaling can be adjusted through ‘Settings’ and then ‘Displays.’ You can select a scaling factor to increase the size of text and icons, with options for fractional scaling that allow for more precise adjustments, which is useful for high-resolution monitors like 4K.
- Google Chrome OS: On Chrome OS, you can change the display scaling by going to ‘Settings,’ then ‘Device,’ and selecting ‘Displays.’ Here, you can adjust the scaling factor to make on-screen items larger, facilitating easier navigation and interaction on high-resolution screens.
- Android: For Android devices, scaling adjustments can be made by accessing ‘Settings,’ then ‘Display,’ and selecting ‘Display size’ or ‘Font size.’ This allows users to increase the size of text and interface elements, ensuring that they are easily readable on 4K displays.